How to Separate a Faulty Inverter PCB from a Faulty Compressor
When an inverter or VRF outdoor unit stops on compressor start failure, over-current or drive/output errors, technicians often face the same question:
Is the root cause the inverter compressor itself, or the inverter PCB (power module/output stage)?
Replacing the wrong part is expensive, wastes time and usually leads to repeated complaints. That’s exactly where an inverter checker (also called an inverter phase checker / inverter analyzer) becomes a practical field tool: it helps you test the inverter PCB output (U-V-W) without the compressor, so you can eliminate the board (or confirm it) before replacing a compressor.
What an inverter checker actually tests (and what it doesn’t)
✅ What it helps you confirm
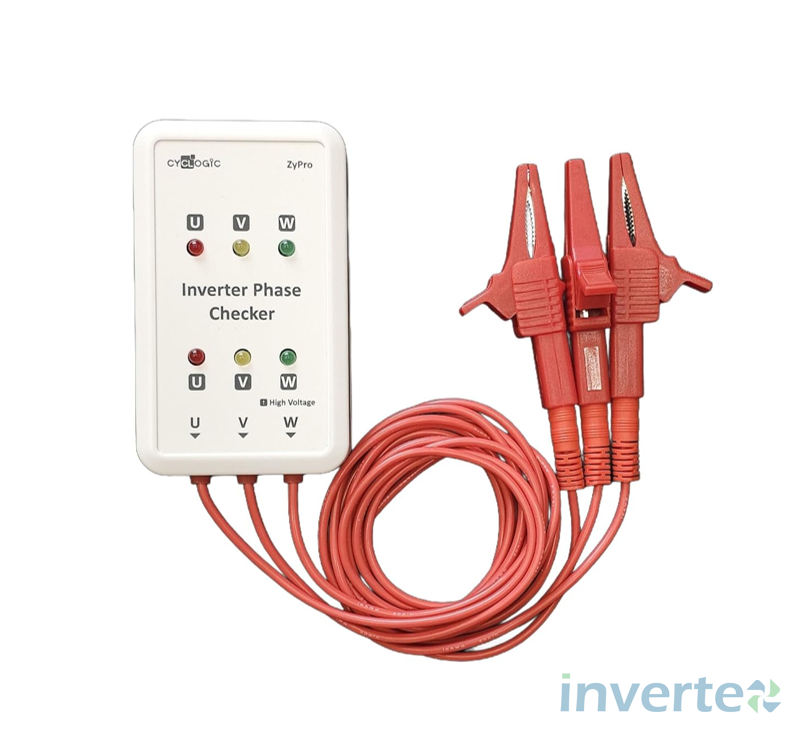
An inverter checker connects to the three compressor output terminals U, V, W and indicates whether the inverter’s phase outputs / output devices are behaving normally. If the inverter output is “good,” you typically see all six indicators active (often LEDs illuminating or blinking depending on the test mode and frequency).
This is aligned with how manufacturers describe inverter analyzer usage: it allows you to judge whether an abnormal stop is caused by compressor failure or main PCB / power module / output stage issues by connecting an analyzer “as a quasi-compressor” and checking inverter output.
❌ What it does not confirm
Even if the inverter PCB output looks fine, the compressor can still be faulty due to:
- winding insulation breakdown / earth leakage
- mechanical lock / bearing failure
- internal sensor issues (brand-dependent)
- refrigerant system issues causing abnormal loading
So, treat the inverter checker as a board-output elimination tool, not a full “compressor health certificate.”
Safety first (this matters with inverter systems)
Inverter outdoor units can contain high DC voltages in the DC bus capacitor bank and those voltages can remain present after power is removed. Some service resources note DC bus levels can be hundreds of volts depending on the design and operating condition.
Cyclogic’s own leaflet emphasizes critical precautions:
- Disconnect power before accessing internal components
- Wait a minimum of 15 minutes for capacitor voltages to decay
- Confirm voltages are zero before connecting/disconnecting terminals
Only qualified technicians should perform these checks.
When to use an inverter checker (typical scenarios)
Use it when the unit shows symptoms such as:
- compressor not starting and trips quickly
- over-current / output stage protection trips
- inverter drive/output error codes (brand-specific)
- suspected IPM / power transistor failure vs. suspected compressor
In these cases, the checker helps you decide whether you should proceed toward compressor replacement or PCB/power module diagnostics.
Step-by-step: How to use the inverter checker (U–V–W method)
Below is the practical workflow you described (with safety and best-practice additions):
1) Power OFF and make the unit safe
- Switch OFF the isolator/breaker.
- Wait for capacitor discharge (minimum 15 minutes is commonly stated for tools of this type).
- Verify no voltage is present before touching terminals (recommended).
2) Disconnect the compressor U–V–W from the inverter PCB
- Identify the three compressor wires labeled U, V, W on the inverter control board.
- Disconnect them from the board (do not leave them able to touch each other).
3) Connect the inverter checker to the inverter PCB output
- Connect the checker leads to the inverter board’s U, V, W output terminals (i.e., board → checker).
Cyclogic’s connection diagram shows this exact concept: disconnect the compressor wires at the control board and connect the phase checker using the supplied cable/leads.
4) Activate the unit’s inverter checking mode / transistor test mode
- Put the unit into the manufacturer’s inverter checking / power transistor test mode (method varies by brand/model).
- Start the test.
Tip: Some inverter boards have a safety cut-out that stops output if a compressor is not detected. In those cases, the indicators may only appear briefly—but if all indicators show correctly during that window, the inverter is likely OK.
5) Read the indicators (6 lights logic)
Your field rule is solid and widely used with these tools:
- If the board is healthy: the 6 lights will blink/activate (often all six are active; blinking speed may change with frequency).
- If there’s a board/output problem: one or more lights won’t blink/activate, or they won’t look uniform—pointing toward an output-stage/power-module issue.
A manufacturer caution worth knowing: at low output frequency LEDs may blink slowly; at higher frequency they may appear almost steady (looks like “ON”).
6) Shut down safely and reconnect
- Stop the test mode, power OFF, and wait until you are sure the system is safe before disconnecting and restoring wiring.
- Reconnect U-V-W back to the compressor, ensuring good terminal condition and tight crimp/connection (poor connections can cause overheating and repeat failures).
How this saves time and cost (real-world value)
Using an inverter checker early in troubleshooting helps you:
- avoid “guess replacement” of compressors
- reduce downtime and repeat visits
- justify your diagnosis clearly to customers and FM teams
- protect your inventory and reduce dead-stock from wrong parts ordering
Important limitations & best practice checklist
Before finalizing a diagnosis, it’s best practice to also confirm:
- incoming power quality and stable supply
- wiring/terminal condition (burnt Faston, loose crimp, moisture damage)
- refrigerant circuit health (extreme pressure conditions can cause abnormal loading)
- compressor winding/insulation checks (where applicable)
The inverter checker is best used as one decision point in a structured diagnostic flow.
Buy Inverter Checker in Dubai (Invertex)
At Invertex, we supply the Cyclogic Inverter Checker / Inverter Phase Checker for HVAC inverter diagnostics—ideal for quickly eliminating inverter PCB output faults before replacing an inverter compressor. Contact us today to get yours!